Hands-on Lab: Building Development Environments with Oracle Container Services for use with Kubernetes
Introduction
In this Hands-On Lab, you will use a combination of Oracle Container Runtime for Docker and Oracle Container Services for use with Kubernetes provided by Oracle to build a tiered web application stack to host a PHP-based application. The lab will step through creating a Kubernetes multi-node cluster and deploying container images to run the web application.
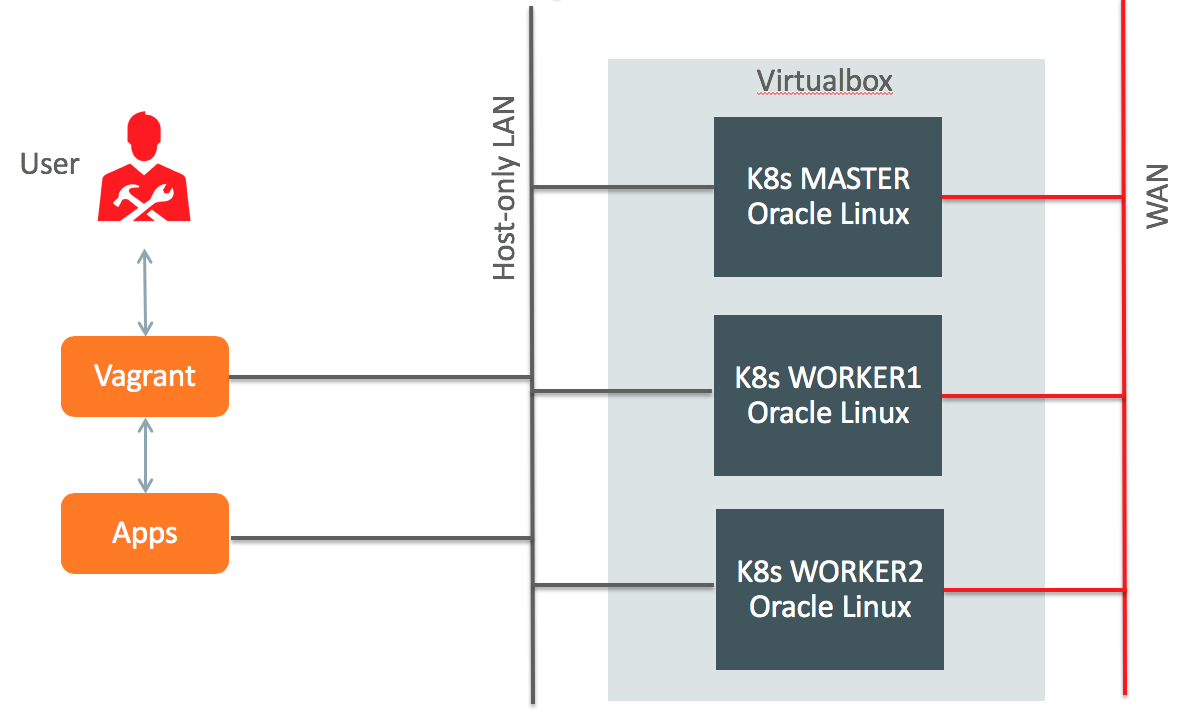
Cluster Layout
The diagram below shows a high-level diagram of the Kubernetes nodes you will build in this lab with your laptop using Vagrant and VirtualBox:
Software used in this Hands-on Lab
Oracle Container Runtime for Docker
The Oracle Container Runtime for Docker allows you to create and distribute applications across Oracle Linux systems and other operating systems that support Docker. Oracle Container Runtime for Docker consists of the Docker Engine, which packages and runs the applications, and the Docker Hub and Docker Store, which share the applications in a Software-as-a-Service (SaaS) cloud.
The Docker Engine is designed primarily to run single applications in a similar manner to LXC application containers that provide a degree of isolation from other processes running on a system.
Oracle Container Services for use with Kubernetes
Kubernetes is an open-source system for automating deployment, scaling and management of containerized applications. Primarily, Kubernetes provides the tools to easily create a cluster of systems across which containerized applications can be deployed and scaled as required.
Oracle Container Services for use with Kubernetes is fully tested on Oracle Linux 7 and includes additional tools developed at Oracle to ease configuration and deployment of a Kubernetes cluster. Oracle has provided and tested a setup and configuration script that takes advantage of the kubeadm cluster configuration utility. This setup script eases configuration and setup on Oracle Linux and provides additional support for backup and recovery.
Accept Oracle Standard Terms and Restrictions
Oracle Container Services for use with Kubernetes is distributed in yum-packages and in Docker images. The Docker images are pulled from the Oracle Container Registry by the kubeadm-setup.sh deployment script.
For the script to be able to install the required components, you must login to the Oracle Container Registry website at https://container-registry.oracle.com using your Single Sign-On credentials.
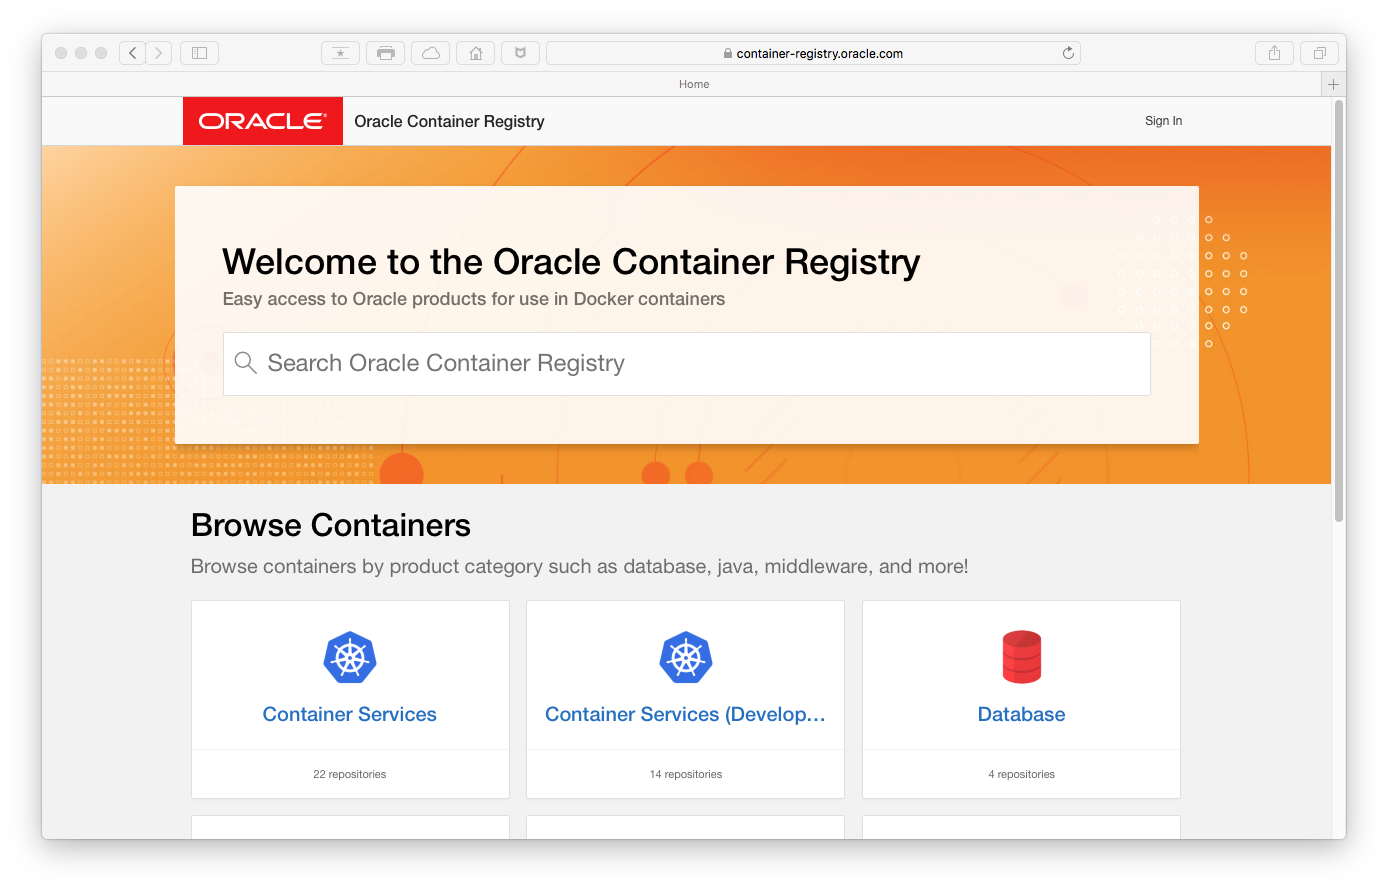
Sign in by clicking Sign in in the upper right side of the window, enter your Oracle SSO Username and password as prompted. After logging in, click to browse the selection Container Services, select the Language from the pulldown menu and click Continue to read and accept the Oracle Standard Terms and Restrictions.
During installation of Kubernetes on the Lab servers you will be asked to provide your Oracle SSO credentials in order to authenticate against the Oracle Container Registry and let the deployment script download the Docker images.
Laptop setup and initial VM login
The software that is needed to run the Lab on a laptop or desktop workstation can be downloaded and installed from the following locations:
- Vagrant: tool for building and managing virtual machine environments
- VirtualBox: free and open-source hypervisor from Oracle
- Oracle Linux Vagrant Boxes: provisions Oracle software automatically in a VirtualBox VM
Lab 1: Build Kubernetes cluster
When Vagrant and Virtualbox are installed on your computer you are ready to deploy the virtual machines for the Lab. Clone (or download) the Oracle Vagrant Boxes repository from Github. These files include workflows to automatically deploy VMs and configure our 3-node Kubernetes cluster. Start with the following installation steps:
- Clone the GitHub repository for Oracle Linux Vagrant boxes (or download zip-file).
$ git clone https://github.com/oracle/vagrant-boxes $ cd vagrant-boxes/Kubernetes - Additional Lab exercises files (Download)
$ unzip kubernetes-hol.zip (unzip in Vagrant project directory) - Build Kubernetes master server.
$ vagrant up master $ vagrant ssh master $ sudo -s # /vagrant/scripts/kubeadm-setup-master.sh (use Oracle SSO credentials) - Build Kubernetes worker servers, repeat this step for for worker2. (See note appendix A)
$ vagrant up worker1
$ vagrant ssh worker1
$ sudo -s
# /vagrant/scripts/kubeadm-setup-worker.sh		(use Oracle SSO credentials)
Lab 2: Basic Kubernetes CLI commands
The kubectl utility is a command line tool that interfaces with the API Server to run commands against the cluster. The tool is typically run on the master node of the cluster. It effectively grants full administrative rights to the cluster and all of the nodes in the cluster. More information on the kubectl utility is available at:
https://kubernetes.io/docs/user-guide/kubectl-overview/
In this section, we describe basic usage of the tool to get you started creating and managing pods and services within your environment. Make sure you are logged on to the Kubernetes master server:
$ vagrant ssh master
Get information about the nodes in a cluster
To get a listing of all of the nodes in a cluster and the status of each node, use the kubectl get command. This command can be used to obtain listings of any kind of resource that Kubernetes supports. In this case, the nodes resource:
$ kubectl get nodes
NAME                 STATUS   ROLES    AGE     VERSION
master.vagrant.vm    Ready    master   6m20s   v1.12.5+2.1.1.el7
worker1.vagrant.vm   Ready    <none>   3m25s   v1.12.5+2.1.1.el7
worker2.vagrant.vm   Ready    <none>   48s     v1.12.5+2.1.1.el7
You can get more detailed information about any resource using the kubectl describe command. If you specify the name of the resource, the output is limited to information about that resource alone, otherwise full details of all resources are also printed to screen:
$ kubectl describe nodes worker1.vagrant.vm
Run an application in a pod
To create a pod with a single running Docker container, you can use the kubectl create command. For example use the following steps to install the webversion of the popular 2048 game. By default, the container image is downloaded from Docker Hub and deployed on ia node in your cluster.
Check that your new application deployment has created one or more pods by using kubectl get pods command. Use kubectl describe to show a more detailed view of your pods, including which containers are running and what image they are based on, as well as which node is currently hosting the pod.
$ kubectl create deployment --image alexwhen/docker-2048 game2048
$ kubectl get pods
$ kubectl get pods -o=wide
$ kubectl describe pods
Scale a pod deployment
To change the number of instances of the same pod that you are running, you can use the kubectl scale deployment command.
You can check that the number of pod instances has been scaled appropriately and most likely the pods are distributed over the worker nodes.
$ kubectl scale deployment game2048 --replicas=3
$ kubectl get pods -o=wide
NAME                        READY   STATUS    RESTARTS   AGE     IP           NODE                 NOMINATED NODE
game2048-7548b64d7f-fwtv9   1/1     Running   0          8s      10.244.2.2   worker2.vagrant.vm   <none>
game2048-7548b64d7f-gfxwv   1/1     Running   0          6m24s   10.244.1.2   worker1.vagrant.vm   <none>
game2048-7548b64d7f-l5jnz   1/1     Running   0          8s      10.244.1.3   worker1.vagrant.vm   <none>
Expose a service object for your application
Typically, while many applications may only need to communicate internally within a pod, or even across pods, you may need to expose your application externally so that clients outside of the Kubernetes cluster can interface with the application. In this case you want to use a browser to access the game.
This is done by creating a service definition for the deployment. To expose a deployment using a service object, you must define the service type that should be used. If you are not using a cloud-based load balancing service, you can set the service type to NodePort. The NodePort service exposes the application running within the cluster on a dedicated port on the public IP address on all of the nodes within the cluster. Use the kubectl expose deployment to create a new service.
Use kubectl get services to list the different services that the cluster is running, and to obtain the port information required to access the service.
$ kubectl expose deployment game2048 --type=NodePort --name=game2048 --port=80
$ kubectl get services game2048
NAME       TYPE       CLUSTER-IP      EXTERNAL-IP   PORT(S)        AGE
game2048   NodePort   10.101.95.100   <none>        80:30807/TCP   26s
In this example output, you can see that traffic to port 80 inside the cluster is mapped to the NodePort 30807. The external IP that can be used to access the service is listed as <none>, meaning that if you connect to the external IP address for any of the nodes within the cluster on the port 30807, you are able access the service.
For the sake of the example in this guide, you can open a web browser to point at any of the nodes in the cluster, such as http://192.168.99.101:30807/ (replace 30807 with the service port nummer of your Kubernetes deployment), and it should display the 2048 Game example application.
Delete a service or deployment
Objects can be deleted easily within Kubernetes so that your environment can be cleaned. Use the kubectl delete command to remove an object. To delete a service, specify the services object and the name of the service that you wish to remove. To delete an entire deployment, and all of the pod replicas running for that deployment, specify the deployment object and the name that you used to create the deployment.
$ kubectl delete services game2048
$ kubectl delete deployment game2048
Lab 3: Deploying PHP Guestbook application with Redis
Disclaimer: this Lab exercises is copied from the Kubernetes documentation website. I have copied the text and the code examples and adjusted to the Vagrant and VirtualBox lab environment used in this hands-on lab.
This tutorial shows you how to build and deploy a simple, multi-tier web application using Kubernetes and Docker. This example consists of the following components:
- A single-instance Redis master to store guestbook entries
- Multiple replicated Redis instances to serve reads
- Multiple web frontend instances
The manifest files to deploy the application in the Kubernetes cluster are in the lab-exercises hol directory, the files are located on the master Kubernetes server under /vagrant/hol. Explore the manifest files before you launch the application to understand the deployment.
$ cd /vagrant/
$ ls -l hol
total 24
-rw-r--r--. 1 vagrant vagrant 1107 Aug 14  2018 frontend-deployment.yaml
-rw-r--r--. 1 vagrant vagrant  438 Aug 14  2018 frontend-service.yaml
-rw-r--r--. 1 vagrant vagrant  586 Aug 14  2018 redis-master-deployment.yaml
-rw-r--r--. 1 vagrant vagrant  233 Aug 14  2018 redis-master-service.yaml
-rw-r--r--. 1 vagrant vagrant 1134 Aug 14  2018 redis-slave-deployment.yaml
-rw-r--r--. 1 vagrant vagrant  209 Aug 14  2018 redis-slave-service.yaml
Start up the Redis master
The guestbook application uses Redis to store its data. It writes its data to a Redis master instance and reads data from multiple Redis slave instances. The manifest file, included below, specifies a Deployment controller that runs a single replica Redis master Pod.
$ more /vagrant/hol/redis-master-deployment.yaml
apiVersion: apps/v1 # for versions before 1.9.0 use apps/v1beta2
kind: Deployment
metadata:
  name: redis-master
  labels:
    app: redis
spec:
  selector:
    matchLabels:
      app: redis
      role: master
      tier: backend
  replicas: 1
  template:
    metadata:
      labels:
        app: redis
        role: master
        tier: backend
    spec:
      containers:
      - name: master
        image: k8s.gcr.io/redis:e2e  # or just image: redis
        resources:
          requests:
            cpu: 100m
            memory: 100Mi
        ports:
        - containerPort: 6379
Apply the Redis Master Deployment from the redis-master-deployment.yaml file. Query the list of Pods to verify that the Redis Master Pod is running (this may take some time) and run the kubectl logs command to view the logs from the Redis Master Pod.
$ kubectl apply -f /vagrant/hol/redis-master-deployment.yaml
$ kubectl get pods
NAME                            READY   STATUS    RESTARTS   AGE
redis-master-57fc67768d-pnhc9   1/1     Running   0          3m2s

$ kubectl logs -f redis-master-57fc67768d-pnhc9		(replace with your name of Pod)
The guestbook applications needs to communicate to the Redis master to write its data. You need to apply a Service to proxy the traffic to the Redis master Pod. A Service defines a policy to access the Pods. This manifest file creates a Service named redis-master with a set of labels that match the labels previously defined, so the Service routes network traffic to the Redis master Pod.
$ more /vagrant/hol/redis-master-service.yaml
apiVersion: v1
kind: Service
metadata:
  name: redis-master
  labels:
    app: redis
    role: master
    tier: backend
spec:
  ports:
  - port: 6379
    targetPort: 6379
  selector:
    app: redis
    role: master
    tier: backend
Apply the Redis Master Service from the redis-master-service.yaml file and query the list of Services to verify that the Redis Master Service is running.
$ kubectl apply -f /vagrant/hol/redis-master-service.yaml
$ kubectl get service
NAME           TYPE        CLUSTER-IP      EXTERNAL-IP   PORT(S)    AGE
redis-master   ClusterIP   10.101.136.45   <none>        6379/TCP   8s
Start up the Redis slaves
In this section we create the Redis slave containers, as you will see we will create replicas to scale the deployment of the slaves. Deployments scale based off of the configurations set in the manifest file. In this case, the Deployment object specifies two replicas. If there are not any replicas running, this Deployment would start the two replicas on your container cluster. Conversely, if there are more than two replicas are running, it would scale down until two replicas are running.
$ more /vagrant/hol/redis-slave-deployment.yaml
apiVersion: apps/v1 # for versions before 1.9.0 use apps/v1beta2
kind: Deployment
metadata:
  name: redis-slave
  labels:
    app: redis
spec:
  selector:
    matchLabels:
      app: redis
      role: slave
      tier: backend
  replicas: 2
  template:
    metadata:
      labels:
        app: redis
        role: slave
        tier: backend
    spec:
      containers:
      - name: slave
        image: gcr.io/google_samples/gb-redisslave:v1
        resources:
          requests:
            cpu: 100m
            memory: 100Mi
        env:
        - name: GET_HOSTS_FROM
          value: dns
        ports:
        - containerPort: 6379
Apply the Redis Slave Deployment from the redis-slave-deployment.yaml file and query the list of Pods to verify that the Redis Slave Pods are running.
$ kubectl apply -f /vagrant/hol/redis-slave-deployment.yaml
$ kubectl get pods
NAME                            READY   STATUS    RESTARTS   AGE
redis-master-57fc67768d-pnhc9   1/1     Running   0          6m58s
redis-slave-57f9f8db74-nl9sj    1/1     Running   0          40s
redis-slave-57f9f8db74-s2vxj    1/1     Running   0          40s
The guestbook application needs to communicate to Redis slaves to read data. To make the Redis slaves discoverable, you need to set up a Service. A Service provides transparent load balancing to a set of Pods.
$ more /vagrant/hol/redis-slave-service.yaml
apiVersion: v1
kind: Service
metadata:
  name: redis-slave
  labels:
    app: redis
    role: slave
    tier: backend
spec:
  ports:
  - port: 6379
  selector:
    app: redis
    role: slave
    tier: backend
Apply the Redis Slave Service from the following redis-slave-service.yaml file and query the list of Services to verify that the Redis slave service is running.
$ kubectl apply -f /vagrant/hol/redis-slave-service.yaml
$ kubectl get services
NAME           TYPE        CLUSTER-IP      EXTERNAL-IP   PORT(S)    AGE
redis-master   ClusterIP   10.101.136.45   <none>        6379/TCP   2m
redis-slave    ClusterIP   10.111.95.242   <none>        6379/TCP   8s
Set up and expose the Guestbook frontend
The guestbook application has a web frontend serving the HTTP requests written in PHP. It is configured to connect to the redis-master Service for write requests and the redis-slave service for Read requests.
$ more /vagrant/hol/frontend-deployment.yaml
apiVersion: apps/v1 # for versions before 1.9.0 use apps/v1beta2
kind: Deployment
metadata:
  name: frontend
  labels:
    app: guestbook
spec:
  selector:
    matchLabels:
      app: guestbook
      tier: frontend
  replicas: 3
  template:
    metadata:
      labels:
        app: guestbook
        tier: frontend
    spec:
      containers:
      - name: php-redis
        image: gcr.io/google-samples/gb-frontend:v4
        resources:
          requests:
            cpu: 100m
            memory: 100Mi
        env:
        - name: GET_HOSTS_FROM
          value: dns
        ports:
        - containerPort: 80
Apply the frontend Deployment from the frontend-deployment.yaml file and query the list of Pods to verify that the three frontend replicas are running. We use the labels option for the kubectl get pods command just to filter out the pods we are interested in.
$ kubectl apply -f /vagrant/hol/frontend-deployment.yaml
$ kubectl get pods -l app=guestbook -l tier=frontend
NAME                        READY   STATUS    RESTARTS   AGE
frontend-654c699bc8-92bjb   1/1     Running   0          3m20s
frontend-654c699bc8-kjpxm   1/1     Running   0          3m20s
frontend-654c699bc8-qmbtw   1/1     Running   0          3m20s
The redis-slave and redis-master Services you applied are only accessible within the container cluster because the default type for a Service is ClusterIP. ClusterIP provides a single IP address for the set of Pods the Service is pointing to. This IP address is accessible only within the cluster.
If you want guests to be able to access your guestbook, you must configure the frontend Service to be externally visible, so a client can request the Service from outside the container cluster.
In this Lab we expose Services through NodePort option, where the the NodePort service serves as the external entry point for incoming requests for your application. The internal port 80 in the frontend Pod will be mapped to a specific port on the host server (somewhere in the 30.000 range). Some cloud providers support external load balancers. If the cloud provider supports load balancers and you want to use it, simply delete type NodePort, and use the service type LoadBalancer.
$ more /vagrant/hol/frontend-service.yaml
apiVersion: v1
kind: Service
metadata:
  name: frontend
  labels:
    app: guestbook
    tier: frontend
spec:
  # comment or delete the following line if you want to use a LoadBalancer
  type: NodePort
  # if your cluster supports it, uncomment the following to automatically create
  # an external load-balanced IP for the frontend service.
  # type: LoadBalancer
  ports:
  - port: 80
  selector:
    app: guestbook
    tier: frontend
Apply the frontend Service from the frontend-service.yaml file and query the list of Services to verify that the frontend Service is running.
$ kubectl apply -f /vagrant/hol/frontend-service.yaml
$ kubectl get services
NAME           TYPE        CLUSTER-IP      EXTERNAL-IP   PORT(S)        AGE
frontend       NodePort    10.106.138.10   <none>        80:31473/TCP   6s
redis-master   ClusterIP   10.101.136.45   <none>        6379/TCP       6m53s
redis-slave    ClusterIP   10.111.95.242   <none>        6379/TCP       5m1s
Pay attention to the line that starts with “frontend”, this Service is type NodePort and it shows that internal port 80 in the pod is mapped to port 31473 on the worker host (in this example, in your server it may be a different port). Use the port number and the IP-address of one of your worker nodes (192.168.99.101 or 192.168.99.102) to point your browser to the application at URL http://192.168.99.101:31473/
Scale the Web Frontend
Scaling up or down is easy because your servers are defined as a Service that uses a Deployment controller. Run the following command to scale up the number of frontend Pods and query the list of Pods to verify the number of frontend Pods running.
$ kubectl scale deployment frontend --replicas=5
$ kubectl get pods -l app=guestbook -l tier=frontend -o=wide
NAME                        READY   STATUS    RESTARTS   AGE     IP           NODE                 NOMINATED NODE
frontend-654c699bc8-92bjb   1/1     Running   0          5m39s   10.244.2.5   worker2.vagrant.vm   <none>
frontend-654c699bc8-cctw6   1/1     Running   0          24s     10.244.1.8   worker1.vagrant.vm   <none>
frontend-654c699bc8-kjpxm   1/1     Running   0          5m39s   10.244.1.6   worker1.vagrant.vm   <none>
frontend-654c699bc8-qmbtw   1/1     Running   0          5m39s   10.244.1.7   worker1.vagrant.vm   <none>
frontend-654c699bc8-v4dmz   1/1     Running   0          24s     10.244.2.6   worker2.vagrant.vm   <none>
Run the following command to scale down the number of frontend Pods and query the list of Pods to verify the number of frontend Pods running.
$ kubectl scale deployment frontend --replicas=2
$ kubectl get pods -l app=guestbook -l tier=frontend
NAME                        READY   STATUS    RESTARTS   AGE
frontend-654c699bc8-kjpxm   1/1     Running   0          6m54s
frontend-654c699bc8-qmbtw   1/1     Running   0          6m54s
Lab 4: Addditional exercises
In this hands-on Lab you have worked with two possible deployment scenario’s, a single application and a multi-tier application. Additional exercises are available to learn more on deploying cloud-native apps in Oracle Linux Cloud Native Environment.
Start with deploying Helm, the package manager for Kubernetes. It’s similar to yum on Oracle Linux, with Helm and Helm charts you deploy preconfigured applications in your Kubernetes cluster. See the following How-to I have created:
How-to: Install Helm package manager for on-premise Oracle Linux and Kubernetes
Another nice exercise is to deploy the Prometheus Kubernetes operator in your Kubernetes cluster. Prometheus is the defacto monitoring system in Kubernetes and it includes a wonderfull grahpical view (Grafana) on system and container resources running on the cluster. The deployment steps are available in another How-to:
Working with storage isn’t trivial in Kubernetes. By default all the storage used in a container image is removed when the containers shuts down or reboots. I have created a little How-to on how to use persistent storage with NFS in your Kubernetes test cluster. Additionally, deploy a Wordpress application using NFS storage for wordpress and mysql following the tutorial which I found on medium.com:
How to deploy WordPress and MySQL on Kubernetes
Appendix A
Single node Kubernetes server
If your host computer has a lack of resources (disk or memory) then you may skip step 4 in Lab 1 and continue with a single-node Kubernetes configuration. In that case you need to change the configuration and allow running application containers on the master server (by default the application containers only run on the worker servers).
Login to the Kubernetes master server and use the following command to taint the server (run as the vagrant user, not root) :
$ vagrant ssh master
$ kubectl taint nodes --all node-role.kubernetes.io/master-
Stop, start, suspend, resume, destroy
If you want to stop your work on the Kubernetes cluster running on your Vagrant VMs and then later on resume your work, the following Vagrant CLI commands are available.
Start and Stop
$ vagrant halt			# shuts down running VM
$ vagrant up			# starts up VM, even if it's already configured/created
Suspend and resume
$ vagrant suspend		# suspends running VM, rather than full shutdown
$ vagrant resume		# resumes VM that was previously suspended
Remove VMs
$ vagrant destroy # stops VM and destroys all resources